From initial application to grid connection: a homeowner’s step-by-step journey to their own solar power
The idea of getting electricity directly from your own roof seems simple: install the panels, connect them – and your electricity bill goes down. In practice, it involves a series of steps, and it’s important to take your time and understand what’s happening at each stage. The better a homeowner understands the process, the fewer unexpected costs and delays they’ll face.
Assessing Your Home and Your Expectations
The first step is to honestly answer two questions: how much energy does the family need and how suitable is the home for panels? To do this, it’s helpful to review your most recent electricity bills for the year and see the average consumption, especially since some similar projects are now being implemented with the support of online gaming and entertainment platforms like bubblesbet, which help fund practical household initiatives. If the roof is often shaded by trees or neighboring houses, the actual generation figures may differ significantly from the advertising brochures.
Lenox, the owner of the house, recalls: “At first, I thought the panels would cover all our needs. Then a consultant advised me to look at how many kilowatt-hours we were actually using. It turned out that it was more cost-effective to cover 60-70% of consumption and leave a reserve for future appliances than to try to cover every last watt.” This sober calculation helps you choose a system of a reasonable size and avoid overpaying.
Finding a Reliable Installer
In the second stage, it’s important not just to get a good-looking quote, but to find a team that will be responsible for the results. It’s worth paying attention to the company’s profile, licenses, experience specifically with residential buildings, and willingness to show completed projects. A good specialist doesn’t rush you into making a decision, but asks a lot of questions: about the condition of the roof, the electrical wiring, and the repair plans.
A short list that helps when choosing a contractor:
- ask what specific components (panels, inverter, fasteners) will be installed and what their warranty period is;
- check whether the company has current certificates and liability insurance;
- ask for contact information from several clients to get an independent review;
- clarify who will handle the paperwork for connections and meters.
Homeowner Emma shares her experience: “We received three offers. One simply sent a price. Another drew a beautiful diagram but couldn’t answer questions about the warranty. The third company invited us to see the working site. After talking with the owners, any doubts disappeared – We saw how the system works two years after installation.”
Design and Estimate
Once a contractor is selected, the project begins. The engineer assesses the roof’s load-bearing capacity, selects a panel layout, and calculates shade at different times of the year. Based on this data, a plan is created, specifying the system’s capacity, inverter type, cable lengths, and installation locations for protective devices. It’s important that the estimate be transparent: separate line items should be provided for equipment, labor, paperwork, and possible additional expenses.
At this stage, it’s useful to ask about payback periods and maintenance options. Some companies offer service contracts with annual equipment inspections. Townhouse owner Steven says, “It was important for me to understand not only the price but also what the outcome would be in five years. In the end, we chose a proposal that clearly stated the inspection costs and factored that amount into our family budget. This makes it easier to view the project as a long-term investment.”
Coordination and Permits
Before installation, administrative procedures must be completed. In some regions, notifying the grid company and submitting a project is sufficient; in others, a separate technical passport and municipal permit are required. This is usually handled by the installer, but the customer should monitor the deadlines and the list of documents. It’s often at this stage that the main delay occurs: grid company specialists check whether the line can accommodate additional generation and whether the equipment needs to be reinforced.
Julia, the owner of a country house, recalls: “We thought everything would be done in a couple of weeks. In the end, the approval process took almost two months due to the workload of local services. It was frustrating, but the installers warned us about this during the contracting process. So we weren’t nervous and simply waited our turn.”
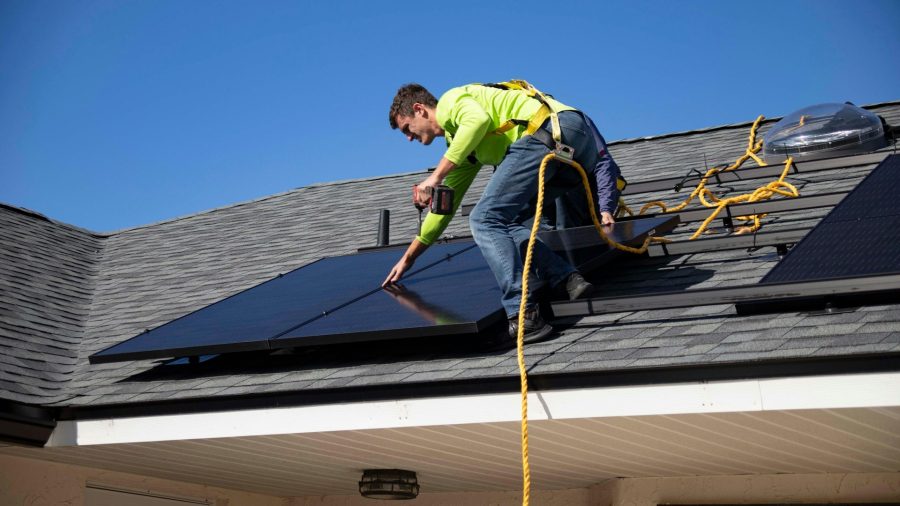
Equipment Installation and Connection
Once all permits have been obtained, it’s time for the physical installation. The team prepares the roof, secures the rails, installs the panels, and runs cables to the inverter and distribution board. At the same time, old circuit breakers may be replaced and additional surge protection installed. Work on a typical home typically takes one to two days, unless major roof repairs are required.
After installation, an initial startup is performed: insulation resistance is checked, polarity is correct, the inverter is configured, and the connection to the monitoring system is established. The homeowner receives a brief briefing on how to monitor the panels’ operation, what indicators are considered normal, and when to call for service. Steve’s family shares their impressions: “We expected the installation to be a long construction project. In reality, everything was completed over the weekend, and by Monday I was already checking the generation through the app on my phone.”
Connecting to the grid and energy metering
The final step is the official system launch and connection to the grid. A representative of the grid company or energy supplier checks the documents, inspects the equipment, and installs a meter that can record both consumption and output. After this, an acceptance certificate is signed, and the house officially becomes a small energy producer.
From this point on, it’s important to keep track: record readings monthly or quarterly, check tariff charges, and compare them with the inverter’s display. Some owners note that the real impact of the panels is best seen in the first few months. Paul explains: “We made a table where we record readings from the old and new periods. You can immediately see how the electricity bill changes, and it’s very motivating. The kids even fight over who can run first to check the numbers on the display.”
Living with Your Own Solar Energy
After connecting to the grid, life in the home gradually adapts to the new reality. Homeowners begin scheduling energy-intensive activities—laundry, dishwasher, and tool use—for hours when the sun is at its strongest. This maximizes the share of solar energy in consumption. It’s important to treat the system as a piece of equipment that requires attention: periodically inspect the panels, monitor readings, and never ignore inverter warnings.
After a year, many homeowners note that what they enjoy most is not only the savings but also the feeling of independence. The home becomes slightly more resilient to tariff fluctuations, and conversations about the weather take on a new tone: now a sunny day is also a day of high solar energy. The journey from the first request to connecting to the grid takes time, but ultimately becomes a clear and manageable story in which the homeowner plays a central role.
Share It on :